As COVID-19 cases abate and people begin to venture out into the world again, in-person events are set to make a comeback. And while electronic business cards may have been gaining popularity pre-pandemic, there’s no doubt they are a networking essential today.
An electronic business card (also known as a digital business card or NFC business card) is simply a digital version of a traditional paper business card.
Apart from the convenience and coolness factor they offer, one of the awesome things about electronic business cards is that you can share them without ever having to worry about compatibility issues. Sending an electronic business card to an iPhone user? No problem. Android user? Also no problem!
If you're attending or hosting an in-person event, make sure you have an electronic business card ready to go. It could be the difference between making a lasting impression and being forgotten.
Don't know how to make an electronic business card? It takes just a few minutes for a basic version that you can jazz up later, once you learn more about the ins and outs of how you can customize its design. Let us walk you through it with our four-step guide:
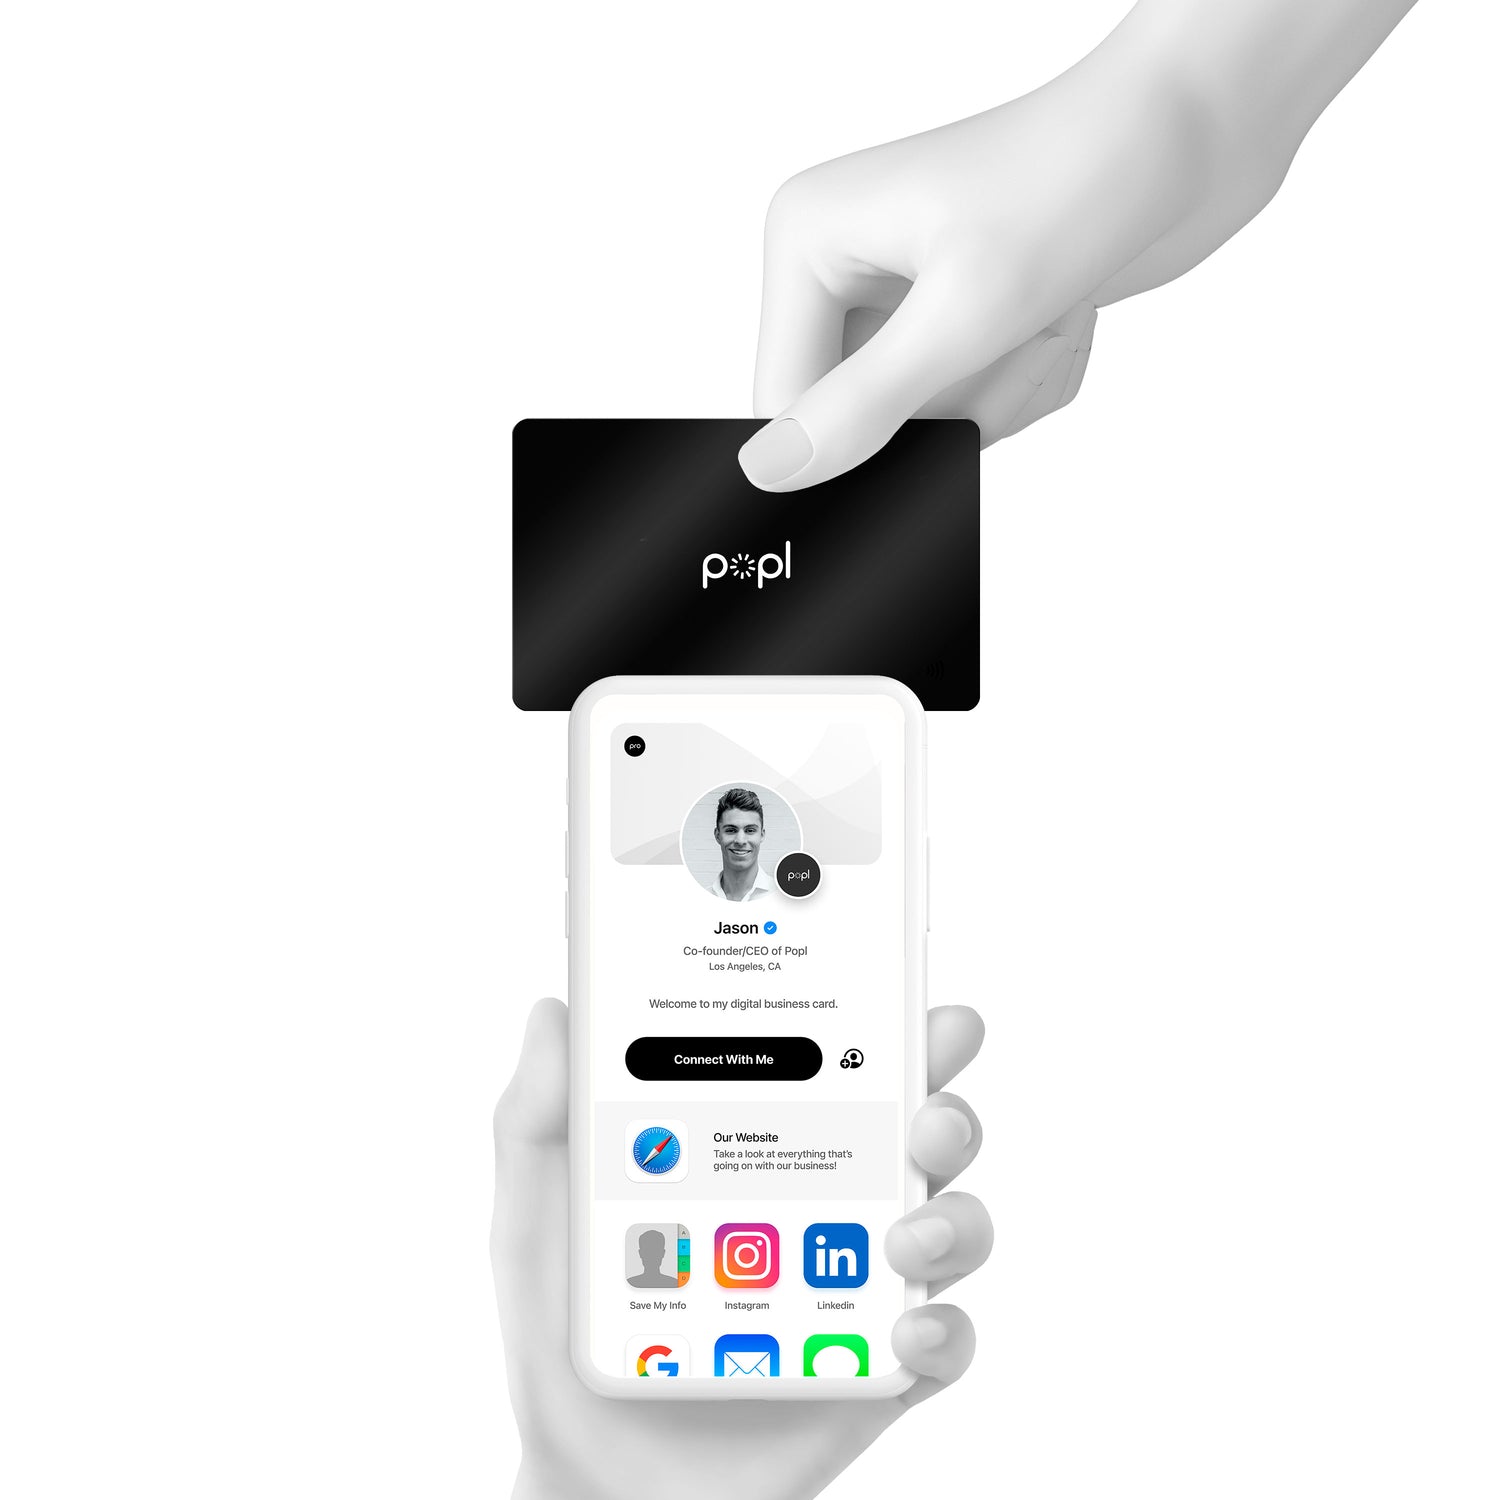
Step One: Get the Popl App
First, you'll need an electronic business card app. The Popl app is available for download on both the App Store and the Play Store.
Popl is the industry leader and offers a free version with no ads or watermarks. You can also upgrade to a paid version for more features, integrations, and automation. Popl Pro, the paid version, is especially great for salespeople and online marketers who want to save time and hassle to import and export data to their CRM or workflow automation apps.
The paid version is also a good choice for those who require more control over how your electronic business card appears and functions. It allows you to scan electronic business cards directly into your contacts, add a business logo to your profile, customize your QR code, embed videos, and set your profile themes and styles.
Step Two: Select a Template
Launching the app will bring you to the Popl home screen. Here, you can scroll through different templates and themes to find one that best represents your business or brand.
There are plenty of options to choose from, so take your time in selecting a style or theme that accurately portrays who you are as a business. Pay close attention to the colors, font choices, and overall design—you want an electronic business card that's both professional and visually appealing.
The same standards that apply to traditional business cards also apply to electronic business cards. Keep the design close to industry standards and norms to ensure that they will be taken seriously in your next in-person event.
We generally suggest new users go with a template but if you're feeling adventurous, feel free to start from scratch for a unique design.
Step Three: Add Your Business Information
With your template selected, it's time to start adding your business information. This includes everything from your name and title to your company website and contact information. Be sure to include all the essential information that you would want somebody to know about your business.
Make full use of the larger space afforded by an electronic business card. You can add more than just the basics here—links to your social media profiles, a video introduction, or even an interactive map showing your location. The key is to include all the information you think would be most useful to somebody looking to get in touch with your business.
Freelancers, for example, may want to include links to online payment platforms like PayPal or Venmo. Online retailers may want to include a link to their latest product catalog. The possibilities are endless—get creative and think about what would be most useful for your contacts.
As you add each piece of information, take a step back and look at the card as a whole. This will help you determine if anything is out of place or if the overall design needs more work. Proofread everything carefully. Small typos can make a big impression, so it's important to ensure that everything is accurate and up-to-date.
Step Four: Share It with the World!
Now it's time for the exciting part: sharing your electronic business card with the world!
There are a few ways to do this with Popl. You can share them via a link, which can be emailed, messaged, or posted on social media. You can also generate a QR code, which can be scanned by other Popl users or any QR code scanner.
But our favorite—particularly for in-person events—is by leveraging Popl's Near Field Communication (NFC) tech. Simply pop your Popl-equipped device—whether that's your smartphone, keychain, or a metal card—-against any other device that supports NFC, which most phones are equipped with.
There's no need for other devices to install Popl. The app uses the built-in NFC support of iOS and Android to automatically open your card on the other device. It's quick, it's easy, and it works like a charm every time.
And that's it! You now know how to create an electronic business card with Popl, leaving you with no excuse not to have one ready for your next in-person event! With your new card in hand, you're ready to take your networking game to the next level.
Our guide works more for individuals, but if you're looking for an electronic business card solution for your team, you won't have to go very far. The Popl Teams platform allows you to create and manage thousands of electronic business cards for your employees, clients, or customers. It's the perfect way to stay connected and make a lasting impression at your next in-person event while keeping everyone on the team on the same page.


![[Featured image / hero]: Abstract graphic of a handshake with negotiation and deal elements (contract, dollar signs, balance scale) in the background. Keep this one as the only abstract graphic to anchor the article.](http://popl.co/cdn/shop/articles/11_Post-event_sales_techniques_to_close_more_deals_42a2a532-7b2d-461b-a6e6-d6519f8cd106.png?v=1779890225&width=600)